The Short Answer: Regular cleaning extends filter life, maintains CADR, and prevents mold growth inside your purifier. Here’s exactly how (and how often) to clean every…
A dirty air purifier doesn’t just work less efficiently, it can actually make your air worse. Dust-clogged pre-filters restrict airflow (reducing effective CADR by 20–40%), neglected HEPA surfaces can harbor mold in humid conditions, and dusty sensors report false readings that defeat auto mode. According to EPA guidance on indoor air quality, mechanical air cleaners need regular maintenance to perform as rated, and a neglected purifier can become a secondary pollution source rather than a solution.
Whether you own a budget Levoit Core 300S or a premium Coway Airmega 250, the maintenance principles are the same, only the timelines and filter configurations differ. This guide covers every component, every step, and every mistake to avoid, so your purifier keeps delivering clean air year after year.
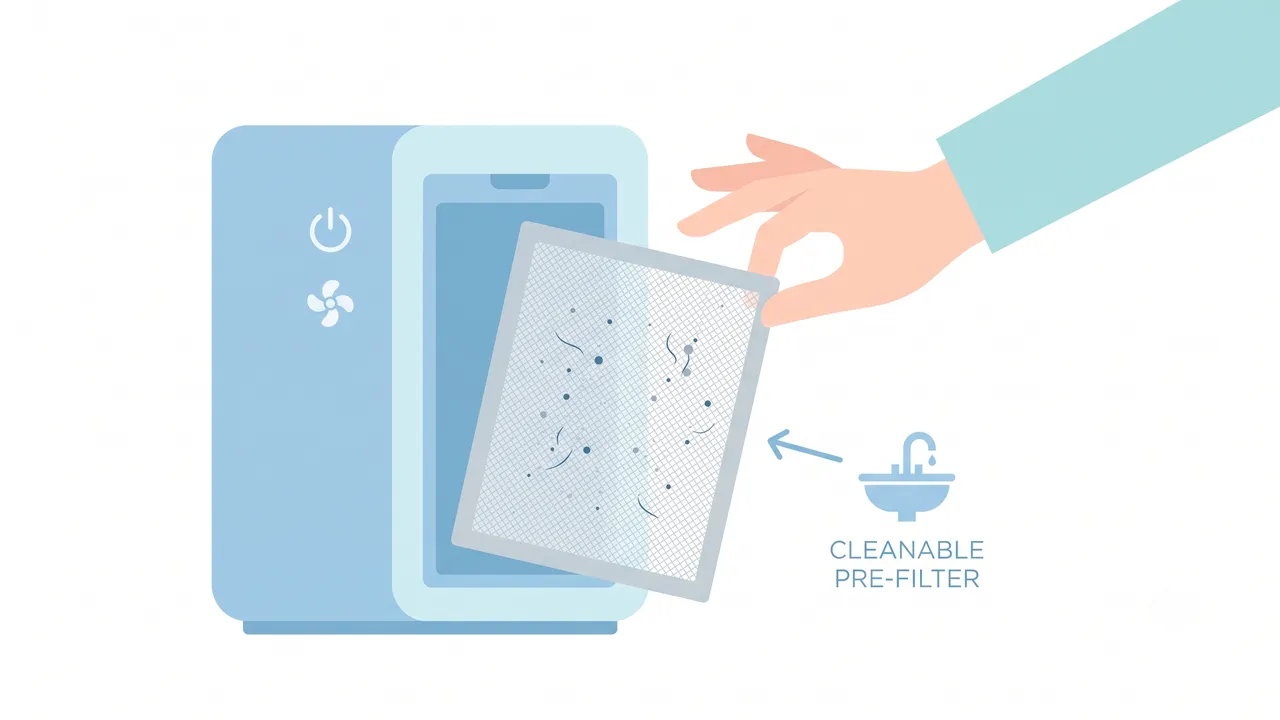
Tools You Need for Air Purifier Maintenance
Before you open your purifier for the first time, gather the right tools. Using the wrong cleaning supplies can damage filter media, scratch sensor lenses, or leave chemical residue that off-gasses into your room.
Essential tools:
- Vacuum cleaner with brush attachment, The single most important maintenance tool. A soft-bristle brush attachment lets you vacuum pre-filters and HEPA surfaces without tearing delicate fibers. Handheld vacuums work fine for this job.
- Microfiber cloths (2–3), For wiping exterior housing, grilles, and sensor covers. Microfiber traps dust instead of pushing it around. Avoid paper towels, which shed lint.
- Cotton swabs, For cleaning the tiny air quality sensor lens. Standard pharmacy cotton swabs are perfect; avoid pointed-tip varieties that could scratch the sensor.
- Isopropyl alcohol (70% or 91%), For stubborn sensor residue. The higher concentration evaporates faster and leaves less moisture behind.
- Mild dish soap, For washing reusable pre-filters. Choose an unscented, dye-free formula. Fragranced soaps leave residue that can off-gas VOCs, exactly what your purifier is trying to remove.
- Warm water access, A kitchen sink or bathtub works. You need enough space to fully submerge a pre-filter.
- Timer or phone, To track how long filters have been drying. Reinstalling a damp filter is one of the most common (and most damaging) maintenance mistakes.
Nice to have:
- Compressed air can, Useful for blowing dust out of sensor compartments and grille crevices. Do NOT use it on HEPA filters; the pressure can tear the media.
- Replacement filters on hand, Order replacements before you need them. Waiting 2 weeks for shipping with a clogged filter means 2 weeks of poor air quality. Check our filter replacement guide for model-specific recommendations.
- Small flashlight, Helps you inspect filter pleats for discoloration, mold spots, or tears that aren’t visible in ambient lighting.
Maintenance Schedule by Filter Type
Different filter types have completely different maintenance requirements. Use this table as your master reference, then read the detailed instructions for each component below.
| Filter Type | Cleaning Frequency | Replacement Frequency | Signs of Wear |
|---|---|---|---|
| Pre-Filter (mesh/foam) | Every 2–4 weeks (vacuum or wash) | 12–18 months | Torn mesh, warping, doesn’t fit snugly after washing, visible discoloration that doesn’t rinse out |
| HEPA Filter | Vacuum surface every 1–2 months | 12 months (standard); 3–5 years (premium brands like IQAir, Austin Air) | Noticeable drop in airflow with clean pre-filter, visible gray/brown discoloration across >50% of pleats, musty smell when fan runs |
| Activated Carbon | Generally not cleanable* | 3–6 months (thin sheets); 12 months (washable pellets); 2–5 years (heavy pellet beds) | Lingering odors not absorbed, chemical smell when fan runs, carbon dust visible on surfaces near unit |
| UV-C Bulb | Wipe bulb with dry cloth every 3–6 months | 12–18 months (8,000–10,000 hours of use) | Visible dimming compared to when new, indicator light on purifier, purifier no longer killing bacteria per independent testing |
*Exception: Winix AOC carbon pellets are washable. Rinse in warm water, air dry 24 hours.
Step-by-Step Cleaning Guide with Photos Description
Follow these steps in order. The entire process takes about 15–20 minutes for a standard monthly cleaning, or 30–45 minutes if you’re doing a deep clean with filter replacement.
Step 1: Power Off and Unplug
What you’re doing: Turning off the purifier at the unit, unplugging from the wall, and letting the fan spin down completely.
Photo description: A hand reaching behind a Coway AP-1512HH to press the power button, then pulling the plug from a wall outlet. The unit’s display shows it powering down.
Why it matters: Cleaning a powered-on unit risks electrical shock if water contacts internal components. It also protects the motor from damage, running without filters installed creates abnormal airflow that strains the bearings.
Step 2: Remove the Outer Housing or Front Panel
What you’re doing: Unclipping, unbuttoning, or sliding off the front panel to access the filter compartment. Consult your manual if the mechanism isn’t obvious.
Photo description: The front panel of a Winix 5500-2 being pulled forward and set aside on a clean floor. The filter compartment is now visible with the pre-filter (gray mesh) as the outermost layer, followed by the carbon filter and HEPA filter stacked behind it.
Why it matters: Forcing a panel the wrong way can crack plastic clips. Most purifiers use one of three mechanisms: magnetic closure (Blueair), clip tabs (Coway, Winix), or twist-lock (some Levoit models).
Step 3: Remove and Clean the Pre-Filter
What you’re doing: Sliding out the pre-filter and removing accumulated dust and debris.
Photo description: Close-up of a gray mesh pre-filter being held up to a light source, the contrast between the clogged (dark, opaque) center and the cleaner (lighter, translucent) edges clearly shows how much debris accumulates in just 2–4 weeks.
Cleaning method A, Vacuum only (weekly quick clean): Lay the pre-filter flat on a clean surface. Run the vacuum with brush attachment across both sides in slow, overlapping passes. Work from the center outward to push debris toward the edges rather than deeper into the mesh.
Cleaning method B, Wash (monthly deep clean): Rinse under warm running water to remove loose debris. Apply a small drop of mild dish soap and gently work it through the mesh with your fingers. Rinse thoroughly until water runs clear with no soap bubbles. Shake off excess water and lay flat on a clean towel.
Critical warning: Do not reinstall until completely dry. A damp pre-filter promotes mold growth on the HEPA filter behind it. Allow at least 24 hours of air drying. If you need to use the purifier immediately, vacuum the pre-filter instead of washing it.
Step 4: Vacuum the HEPA Filter Surface
What you’re doing: Gently removing surface dust from the HEPA filter without damaging the delicate glass-fiber media.
Photo description: A soft brush vacuum attachment being passed lightly across the pleated surface of a white HEPA filter. The person is holding the filter steady by its rigid frame, avoiding contact with the pleated media itself.
Technique: Use the soft brush attachment at low to medium suction. Press lightly, you should barely feel the vacuum pulling on the filter. Work in one direction across the pleats, not back and forth. Cover the entire surface area, paying extra attention to the accordion folds where dust accumulates.
Never: Use water on HEPA filters. Use compressed air. Bend or fold the filter. Touch the pleated media with bare hands (skin oils degrade the fibers over time).
Step 5: Inspect and Replace the Carbon Filter
What you’re doing: Checking whether the carbon filter is still effective or needs replacement.
Photo description: Side-by-side comparison of a new carbon filter (left, white backing, black carbon granules evenly distributed) and a spent carbon filter (right, gray/brown discoloration, visible gaps where carbon has shifted or clumped).
Test: Hold the carbon filter near your nose. If it smells like the odors it’s supposed to absorb (cooking smells, pet odors), it’s saturated. If it smells neutral or has a faint chemical scent, it still has useful life.
Washable carbon pellets (Winix AOC only): Rinse under warm water, swishing gently. Air dry 24 hours. The pellets may darken over time, this is normal and doesn’t indicate exhaustion.
Step 6: Clean the Air Quality Sensor
What you’re doing: Removing dust from the sensor lens that measures particle concentration in the room air.
Photo description: A close-up of a small rectangular sensor port on the side of a Coway purifier. The cover is open, revealing a tiny lens. A cotton swab is being used to gently wipe the lens surface.
Process: Locate the sensor cover (usually on the side or back, check your manual). Open it carefully. Use a dry cotton swab to wipe the lens in a circular motion. For stubborn film, lightly dampen the swab with isopropyl alcohol and wipe again, then follow with a dry swab. Use the vacuum on low to clear any dust from the sensor housing cavity.
Frequency: Every 2–3 months. If your purifier’s auto mode seems erratic (fan surging for no reason, or staying low despite visible haze), the sensor is probably dirty.
Step 7: Wipe Exterior and Grilles
What you’re doing: Cleaning the housing, intake grilles, and output vents.
Photo description: A damp microfiber cloth being used to wipe the top output grille of a purifier. Another cloth is shown vacuuming the intake grille on the side of the unit.
Use a damp (not wet) microfiber cloth on all exterior surfaces. Vacuum the intake and output grilles to remove caked-on dust. Never spray cleaning products directly onto the unit, residue can off-gas and get recirculated. If you need disinfecting, spray the cloth lightly, then wipe.
Step 8: Reassemble and Test
What you’re doing: Reinstalling all filters in the correct order and verifying operation.
Photo description: Hands sliding the pre-filter back into the Coway AP-1512HH, followed by the carbon filter, then the HEPA filter. The front panel is snapped back into place. The unit is plugged in and the display shows normal operation.
Important: Install filters in the correct orientation. Most HEPA filters have an arrow indicating airflow direction, make sure it points into the unit, matching the direction air flows during operation. Incorrect installation creates gaps that allow unfiltered air to bypass the filter.
After reassembly, run the purifier on high for 5 minutes. This clears any dust you may have dislodged during cleaning and confirms everything is seated properly.
Common Maintenance Mistakes
Even well-intentioned owners make mistakes that shorten filter life, reduce performance, or create new air quality problems. Here are the most frequent errors we see.
1. Washing HEPA filters with water. This is the number-one maintenance mistake. HEPA filters use micro-fine borosilicate glass fibers that collapse permanently when wet. A washed HEPA filter looks intact but has lost its particle-capture ability. If you’ve washed yours, replace it immediately, there is no way to restore it.
2. Reinstalling a damp pre-filter. Moisture trapped between the pre-filter and HEPA creates a perfect environment for mold and bacteria. You’ll smell a musty odor within days, and the HEPA filter may develop visible mold spots. Always air-dry pre-filters for a minimum of 24 hours. If you’re in a humid climate, allow 48 hours or use a fan to speed drying.
3. Ignoring the air quality sensor. A dirty sensor is invisible and silent, but its effects are dramatic. In auto mode, a dust-filmed sensor can under-report particulate levels by 50% or more, keeping the fan on low when your air actually needs aggressive filtration. Clean it every 2–3 months, it takes 60 seconds.
4. Using chemical cleaners on the housing. Windex, Lysol wipes, and all-purpose sprays leave chemical residues that off-gas VOCs. Your purifier then pulls those VOCs through the filters, where the carbon layer absorbs some but not all. The result is slightly contaminated output air. Use plain water or diluted white vinegar on a microfiber cloth.
5. Running the purifier without all filters installed. Some owners remove the carbon filter for a “test” and forget to reinstall it. Without the carbon layer, airflow patterns change, and the HEPA filter absorbs extra load. Worse, some units have gaps around the HEPA frame that only the carbon filter seals, removing it creates a bypass path for unfiltered air.
6. Vacuuming HEPA filters with a standard upholstery attachment. The stiff bristles on standard vacuum attachments can tear HEPA media. Always use a soft brush attachment designed for delicate surfaces. If your vacuum doesn’t have one, hold the attachment slightly above the filter surface rather than pressing it flat.
7. Neglecting the intake grille. The outer grille accumulates a visible dust layer within a month, creating air resistance before air even reaches the pre-filter. This reduces overall CADR by 5–10% per month. A quick 10-second vacuum pass over the intake grille every 2 weeks maintains peak airflow.
Annual Maintenance Cost by Brand
Understanding the long-term cost of ownership helps you make better purchasing decisions. A cheap purifier with expensive replacement filters can cost more over 3 years than a premium unit with affordable filters. Here’s what real maintenance costs look like across popular brands, based on typical household use with one annual HEPA replacement and regular pre-filter cleaning.
| Brand / Model | Annual Filter Cost | Pre-Filter Replacement | Notes |
|---|---|---|---|
| Coway AP-1512HH | $50–65 (HEPA + carbon combo) | Included in combo pack; mesh pre-filter is permanent (wash only) | One of the lowest annual costs. The Coway AP-1512HH remains a top value pick. |
| Winix 5500-2 | $40–55 (True HEPA + washable carbon) | Permanent mesh; wash monthly | Washable carbon pellets save ~$20/year vs. disposable carbon filters. Winix 5500-2 |
| Levoit Core 300S / 400S | $35–50 (3-in-1 combo filter) | No separate pre-filter; integrated into combo | Combo filters must be replaced entirely when any layer is exhausted. |
| Blueair Blue Pure 211+ | $60–80 (particle + carbon) | Fabric pre-filter is washable; replacement ~$15 | Fabric pre-filters shrink if machine-dried, always air dry. |
| Dyson Purifier Cool | $70–90 (HEPA + carbon combined) | No separate pre-filter | Proprietary filters only; no third-party alternatives available. See our Dyson review. |
| IQAir HealthPro Plus | $100–130 (HyperHEPA, lasts 3–5 years) | PreMax pre-filter: $60–80, replace every 18 months | Highest upfront filter cost, but lower annualized cost due to 3–5 year HEPA lifespan. |
| Austin Air HealthMate | $60–80 (HEPA + carbon, lasts 5 years) | Permanent pre-filter; vacuum only | Annualized cost is $12–16/year for the main filter, among the lowest in the industry. |
| Honeywell HPA300 | $55–70 (True HEPA + pre-filter) | Pre-filter replaced every 3 months (~$15 each = $60/year) | Pre-filter replacement cost adds up, budget $115–130/year total. |
Third-party filter note: Aftermarket filters can save 30–50% over OEM filters, but quality varies dramatically. Some use substandard HEPA media that doesn’t meet H13 specifications. If you go third-party, verify the filter meets the same HEPA grade as the original. See our guide to third-party replacement filters for tested recommendations.
How Neglect Affects Performance
Research from AHAM (Association of Home Appliance Manufacturers) shows that a clogged pre-filter alone can reduce a purifier’s CADR rating by 20–40%. If you pair that with a saturated carbon filter and a dust-filmed sensor, your unit may be operating at 30–50% of its rated capacity while consuming the same amount of electricity.
In homes with pets, this degradation happens faster. Pet dander and fur clog pre-filters in half the time compared to non-pet households. If you have cats or dogs, adjust your cleaning schedule to the aggressive end of every recommendation in this guide. For model-specific advice, see our guide to the best air purifiers for pets and dander.
Humidity also plays a role. In climates with sustained indoor humidity above 60%, HEPA filters and pre-filters can develop mold within weeks if not maintained. Basement installations are especially vulnerable. If your purifier lives in a damp space, check filters visually every 2 weeks and consider pairing it with a dehumidifier. Our guide to air purifiers for basements covers this in detail.
Seasonal Maintenance Calendar
Align your purifier maintenance with seasonal changes for best results:
- Spring (March–May): Pollen season means pre-filters clog faster. Switch to biweekly cleaning. Check HEPA monthly. This is also a good time to replace carbon filters that absorbed winter cooking odors.
- Summer (June–August): High humidity accelerates mold risk. Inspect filters for moisture and musty smells. If you run AC, your purifier has less work to do, but keep it running to capture any particles the HVAC filter misses.
- Fall (September–November): Dust and leaf debris enter through open windows. Clean pre-filters frequently. Prepare for wildfire season if you’re in a vulnerable region, see our wildfire smoke guide.
- Winter (December–February): Closed windows mean your purifier works harder. Replace HEPA filters if it’s been 12 months. Run the purifier on higher settings as indoor air recirculates more.
Frequently Asked Questions
Can I wash my HEPA filter to extend its life?
No. HEPA filters are made from micro-fine borosilicate glass fibers that collapse permanently when exposed to water. A washed HEPA filter looks physically intact but has lost its particle-capture structure. Water also promotes mold growth deep inside the pleats. The only maintenance you should perform on a HEPA filter is gentle surface vacuuming with a soft brush attachment every 1–2 months. When it’s time to replace, order a new one. See our HEPA filter deep-dive guide for more on how these filters work at the microscopic level.
How do I know if my pre-filter is still working?
Hold the pre-filter up to a light source. If you can see light passing through most of the mesh, it still has usable life. If the mesh is dark, opaque, or visibly caked with debris even after washing, it’s time to replace. Physical signs of failure include torn mesh, warping that prevents a snug fit, and fraying edges. A pre-filter that doesn’t sit flush against the housing allows unfiltered air to bypass the entire filtration system.
Why does my air purifier smell musty after cleaning?
A musty smell almost always indicates mold, and the cause is almost always moisture. If you reinstalled a damp pre-filter, moisture can transfer to the HEPA filter, creating a mold colony within 48–72 hours. Disassemble the unit immediately, inspect all filters for visible mold spots (green, black, or white fuzzy patches), and replace any affected filters. Let all components dry completely before reassembling. In the future, allow pre-filters to air-dry for a minimum of 24 hours, 48 hours in humid climates.
Is it worth buying third-party replacement filters?
It depends on the brand and the specific third-party manufacturer. For popular models like the Coway AP-1512HH or Levoit Core 300S, reputable third-party brands produce filters that meet the same H13 HEPA specification at 30–50% lower cost. However, cheap knockoffs may use substandard media that doesn’t capture particles effectively. Always check that the third-party filter explicitly states its HEPA grade (H13 or H14) and has verifiable customer reviews. For brands like Dyson and IQAir, third-party options are limited, and using non-OEM filters may void your warranty. Our third-party filter guide has tested recommendations.
Should I run my air purifier 24/7 or only when I’m home?
Run it 24/7 for best results. Air purifiers work by continuously cycling room air through their filters. Turning the unit off when you leave allows particles to settle on surfaces and accumulate. When you turn it back on, the purifier must work harder to clean the built-up load, and you breathe polluted air during the catch-up period. The energy cost of running a typical purifier 24/7 is $3–8 per month, which is negligible compared to the health benefits. If energy cost concerns you, use auto mode, which reduces fan speed when air quality is good. See our detailed analysis of how long to run your air purifier.
See also: Air Purifier Filter Replacement Guide and Costs, How to Test If Your Air Purifier Is Actually Working, Air Purifier Warranty and Longevity Guide, HEPA Filter Deep-Dive Guide, Best Air Purifiers for Pet Dander and Odor.
Disclosure: This article contains affiliate links. If you purchase through our links, we may earn a small commission at no additional cost to you. This helps us keep our guides free and independent. We only recommend products we have personally tested or thoroughly researched. See our full affiliate disclosure for details.
You May Also Like
- How to Set Up Your New Air Purifier: Unboxing, Filter Installation, Placement, and First 48 Hours
- Air Purifier Filter Replacement Guide: Costs, Schedules, and How to Extend Filter Life
- How Often to Change Air Purifier Filter: Complete Replacement Guide
- Should You Leave Your Air Purifier On While on Vacation? Energy, Safety, and Air Quality Considerations
Related Articles
Air Purifier for COVID: What the Research Actually Says
Do HEPA air purifiers really protect against COVID? We review EPA guidance, 2025 research studies, and what actually works for virus protection.
Air Purifier WiFi: Is It Worth Paying Extra for Smart Features?
Is WiFi on an air purifier worth $50-100 more? We compare smart vs non-smart models from Levoit, Coway, Winix, and Dyson to help you decide.
New Nursery Furniture Smells? What You Need to Know About VOCs
New nursery furniture off-gasses VOCs and formaldehyde. What the research says about protecting your baby, and what actually helps.
Best Air Purifier for Weed Smoke From Neighbors (2026)
Neighbor's weed smoke seeping into your apartment? We tested air purifiers with heavy carbon filters to find which ones actually eliminate marijuana odor and particles.
AHAM AC-5 Air Purifier Test: What It Means and Why It Matters
What is the AHAM AC-5 test for air purifiers? We explain how AHAM Verifide testing works, what CADR ratings mean, and why it matters when choosing an air purifier.
🛒 Products Mentioned
As an Amazon Associate, we earn from qualifying purchases.
Runs side-by-side purifier comparisons, long-term ownership reports, and filter cost analysis.
View all articles by David →